Tutorial
How To: Create A WordPress Photography Website
There are many reasons to create a WordPress photography website. Maybe you’re a wedding photographer hoping to attract new couples. Or, a commercial photographer in need of showcasing your portfolio to prospective clients. Possibly, you’re just a hobbyist wanting to share photos with friends and family.
Whatever the reason, creating a WordPress photography website is not as difficult as it may seem.
In this tutorial I will break down the 7 steps involved with starting a photography website. As a full disclosure, I will be recommending some products and services from Organic Themes, in addition to others. However, I only recommend products and services that I believe in. I genuinely want to help photographers create a professional website in the easiest and most affordable way.
Just Give Me The Steps!
Don’t care about the details? Well, here is a quick summary of the 7 steps to create a professional photography website:
- Prepare your website photos and content.
- Register a domain name at Hover. (Details)
- Sign up for Organic WordPress Hosting. (Details)
- Get the Photographer Theme. (Details)
- Install, activate, and setup the theme. (Details)
- Replace the demo media and content. (Details)
- Point your domain and launch your site. (Details)
1. Prepare Your Content
It’s best to prepare your website photos and content ahead of time. Unfortunately, this step is skipped far too often when starting a website, and it’s the primary reason so many websites fail to launch. In truth, it’s the easiest step. However, it’s also the most time consuming.
Preparing Website Imagery
All your images should be saved for the web using your preferred photo editing software. Additionally, the files should be named appropriately, and organized into folders.
Generally, I recommend saving images at a width of 1800 pixels. The larger the images, the more space they will consume on your web server, and the longer they will take to load. As a result, a width of 1800 pixels is the sweet spot of size and quality for the web.
Planning Website Content
Fortunately, when it comes to a photography website, you probably won’t have a ton of written content. However, I imagine your website will include some information about yourself, your achievements, services, pricing, etc.
It’s best to have this content ready ahead of time. You wouldn’t believe how much time can be wasted staring at a blank WordPress editing screen, not knowing where to begin. Writers block is real!
As a result, I highly recommend creating a simple outline of the pages, content, and photography categories you plan to include on your website. Personally, Evernote is my application of choice for content planning. Your notes will sync between devices. So, you can plan your website content on your iPad while laying in bed at night, or on your phone at the grocery store.
Trust me, a solid content strategy and prepared photos will save you many hours of time when we arrive at step 6.
2. Register A Domain
Registering a domain is the next step to creating a WordPress photography website — or any website for that matter. Unless you’ve been sleeping under a rock for the past 20 years, you probably know what a domain is. So, I won’t bore you with the details. However, I will explain how to choose your domain, and where to register it.
How To Choose Your Domain Name
When it comes to finding an available domain, you should choose a short and memorable name that clearly defines your photography business. Additionally, you should always aim for registering a “.com” top-level domain (TLD). Unfortunately, that’s easier said than done. Hundreds of millions of domain names have already been registered, many of which are “.com” TLDs.
If the domain you had in mind is already registered, don’t panic. You may just need to get creative.
As an example, let’s say Jane Doe has a photography business named after herself. Ideally, she would choose “janedoe.com” as her domain. However, that’s already registered. So, we’ll try some variations:
janedoephotography.com
janedoephoto.com
janedoepics.com
jdoephotography.com
janedoenyc.com
Any one of those variations may be available for registration. However, Jane should choose the most memorable name. While “janedoephotography.com” is the longer domain, in this case it’s probably the most memorable and professional alternative.
In some cases, using a “.com” TLD might not be the most memorable option for your photography website. Or, maybe you just want to be different. Since 2013, a slew of new TLDs have become available for registration. Among those, are several targeted for the photography industry, including the following:
.photo
.photos
.photography
.pics
.pictures
So, it might be in Jane’s best interest to register “janedoe.photo” as her domain. It should be noted, target market domains such as these generally cost more.
When it comes to getting creative with domain names, I often use Domainr to search for available names. Also, the Thesaurus is your friend.
Where To Register Your Domain
It’s a common misconception that domains must be registered through a hosting provider. In fact, I recommend using a domain registrar separate from your hosting provider. As your site grows, you may want to switch hosting providers. Or, you may just find a better deal with another host.
Whatever the reason, having a domain separate from your host makes it easier to point that domain to a different host in the future. Potentially saving you a headache later down the road.
Personally, Hover is my domain registrar of choice.
I find the Hover domain registration and management interface to be the most user friendly. Plus, they don’t push added services that you don’t need. In comparison, many of the big registrars and hosting providers will nickel and dime you. Additionally, the experience of trying to navigate their management interfaces can be a nightmare. So, use Hover. It’s worth the $3 extra dollars per year.
The Cost Of A Domain
Common TLDs like .com, .net, and .org should cost no more than $15 per year. On the other hand, some targeted TLDs may cost up to $50 per year to register.
Sometimes a domain is registered, but not in use. If the name is highly desirable, it may be worth negotiating for the domain using a service like DomainAgents. However, I would expect to pay several hundred dollars at minimum to secure an already registered domain.
With your domain registered, it’s now time to get hosting.
3. Get WordPress Hosting
Next, you’ll need to secure web hosting. Preferably, managed WordPress hosting.
With a managed WordPress host, the WordPress platform is installed upon signup. This saves you time and confusion. Additionally, the platform updates automatically. So, you don’t have to login to your website regularly to update WordPress. Meaning, your website content will stay safe and secure without constant monitoring.
The Cost Of WordPress Hosting
The cost of managed WordPress hosting varies widely. It ranges from $10 to $300+ per month. The price usually reflects the hosting speed, memory, storage, and number of WordPress installations allowed. In the case of a photography website, you’ll need a single WordPress installation and decent speed and storage.
Since your site will be host to many images, the file size of those images will consume a large amount of server space. Additionally, images take longer to load than simple content. So, it’s probably not in your best interest to choose the cheapest plan available.
You’ll need a hosting plan with enough storage and bandwidth to serve your images quickly. As a result, you should expect to pay around $15 to $30 per month for hosting a photography website. There’s no reason your site should require the high end of the hosting pricing spectrum. Unless, you’re a famous, heavily searched photographer.
Which Host To Choose
You may be acquainted with the large hosting corporations like GoDaddy or Bluehost. Of course, those are options to consider on a very tight budget. But I don’t recommend them.
In my experience (which is extensive), the cheap and large hosting companies are the most difficult to work with. Their hosting interface is confusing. Plus, their marketing strategies often push uneducated buyers into purchasing services they don’t need. Additionally, they are the least likely to help in the event your site becomes infected with malware — or you accidentally delete all of your website content. Unfortunately, those scenarios are all too common.
Personally, I recommend Organic Hosting. It’s high quality managed WordPress hosting at an affordable rate. You’ll receive all the features and support necessary to create a WordPress photography website.
Other great managed WordPress hosts include:
Upon signup, WordPress will be automatically installed on your staging domain. Eventually, we’ll replace the staging domain with your previously purchased domain. However, that’s the last step. Let’s get your site ready before going live.
You should receive a link via email or within your hosting account directing you to the WordPress dashboard of your staging domain. So, let’s login to your dashboard. Next, we’ll install a theme and begin adding your content.
4. Get The Photographer Theme
Next, you’ll need a professional WordPress theme designed for showcasing photography. That’s where the Photographer Theme comes in.
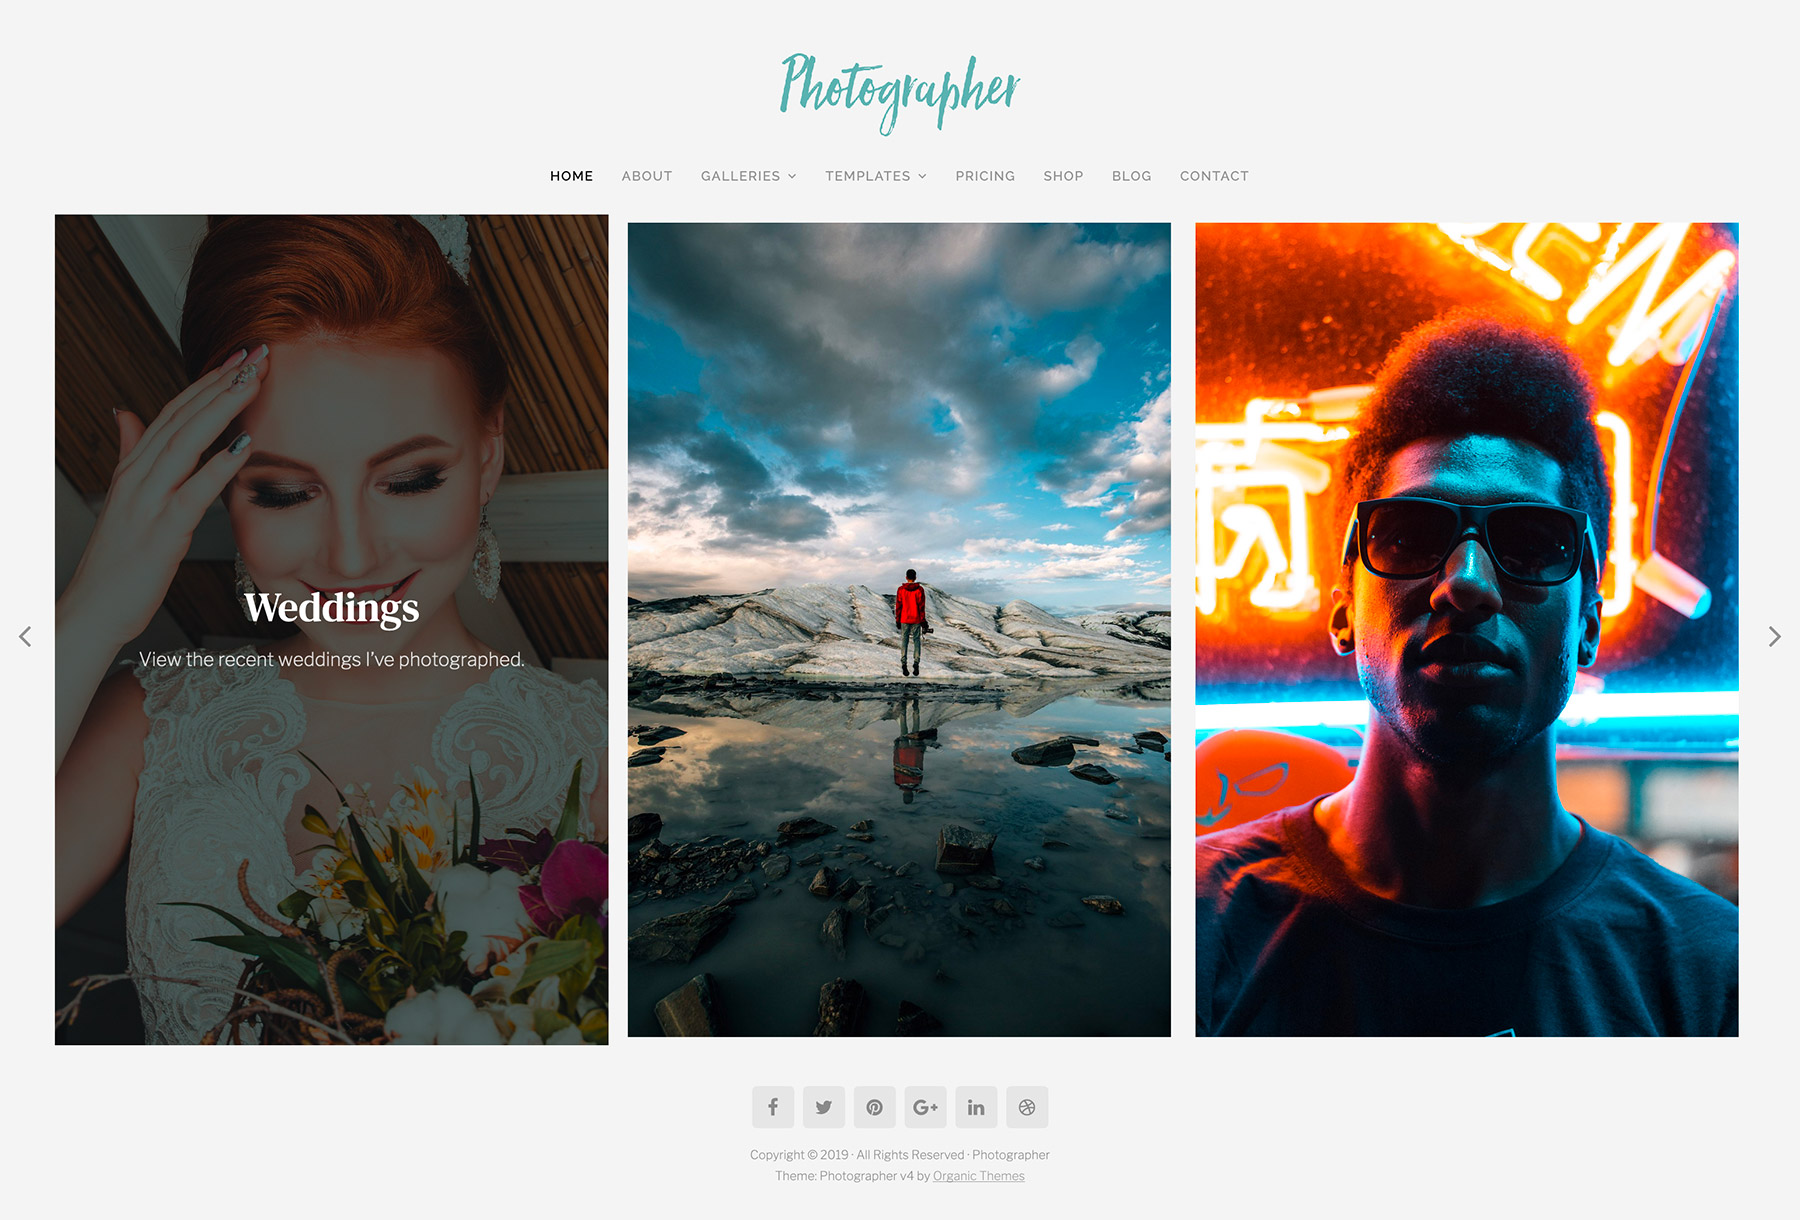
The Photographer Theme is perfect for the job. It’s minimal design focuses on the photography. So, visitors can appreciate your work without distraction. Additionally, the theme is continually updated by Organic Themes to utilize the latest WordPress technology.
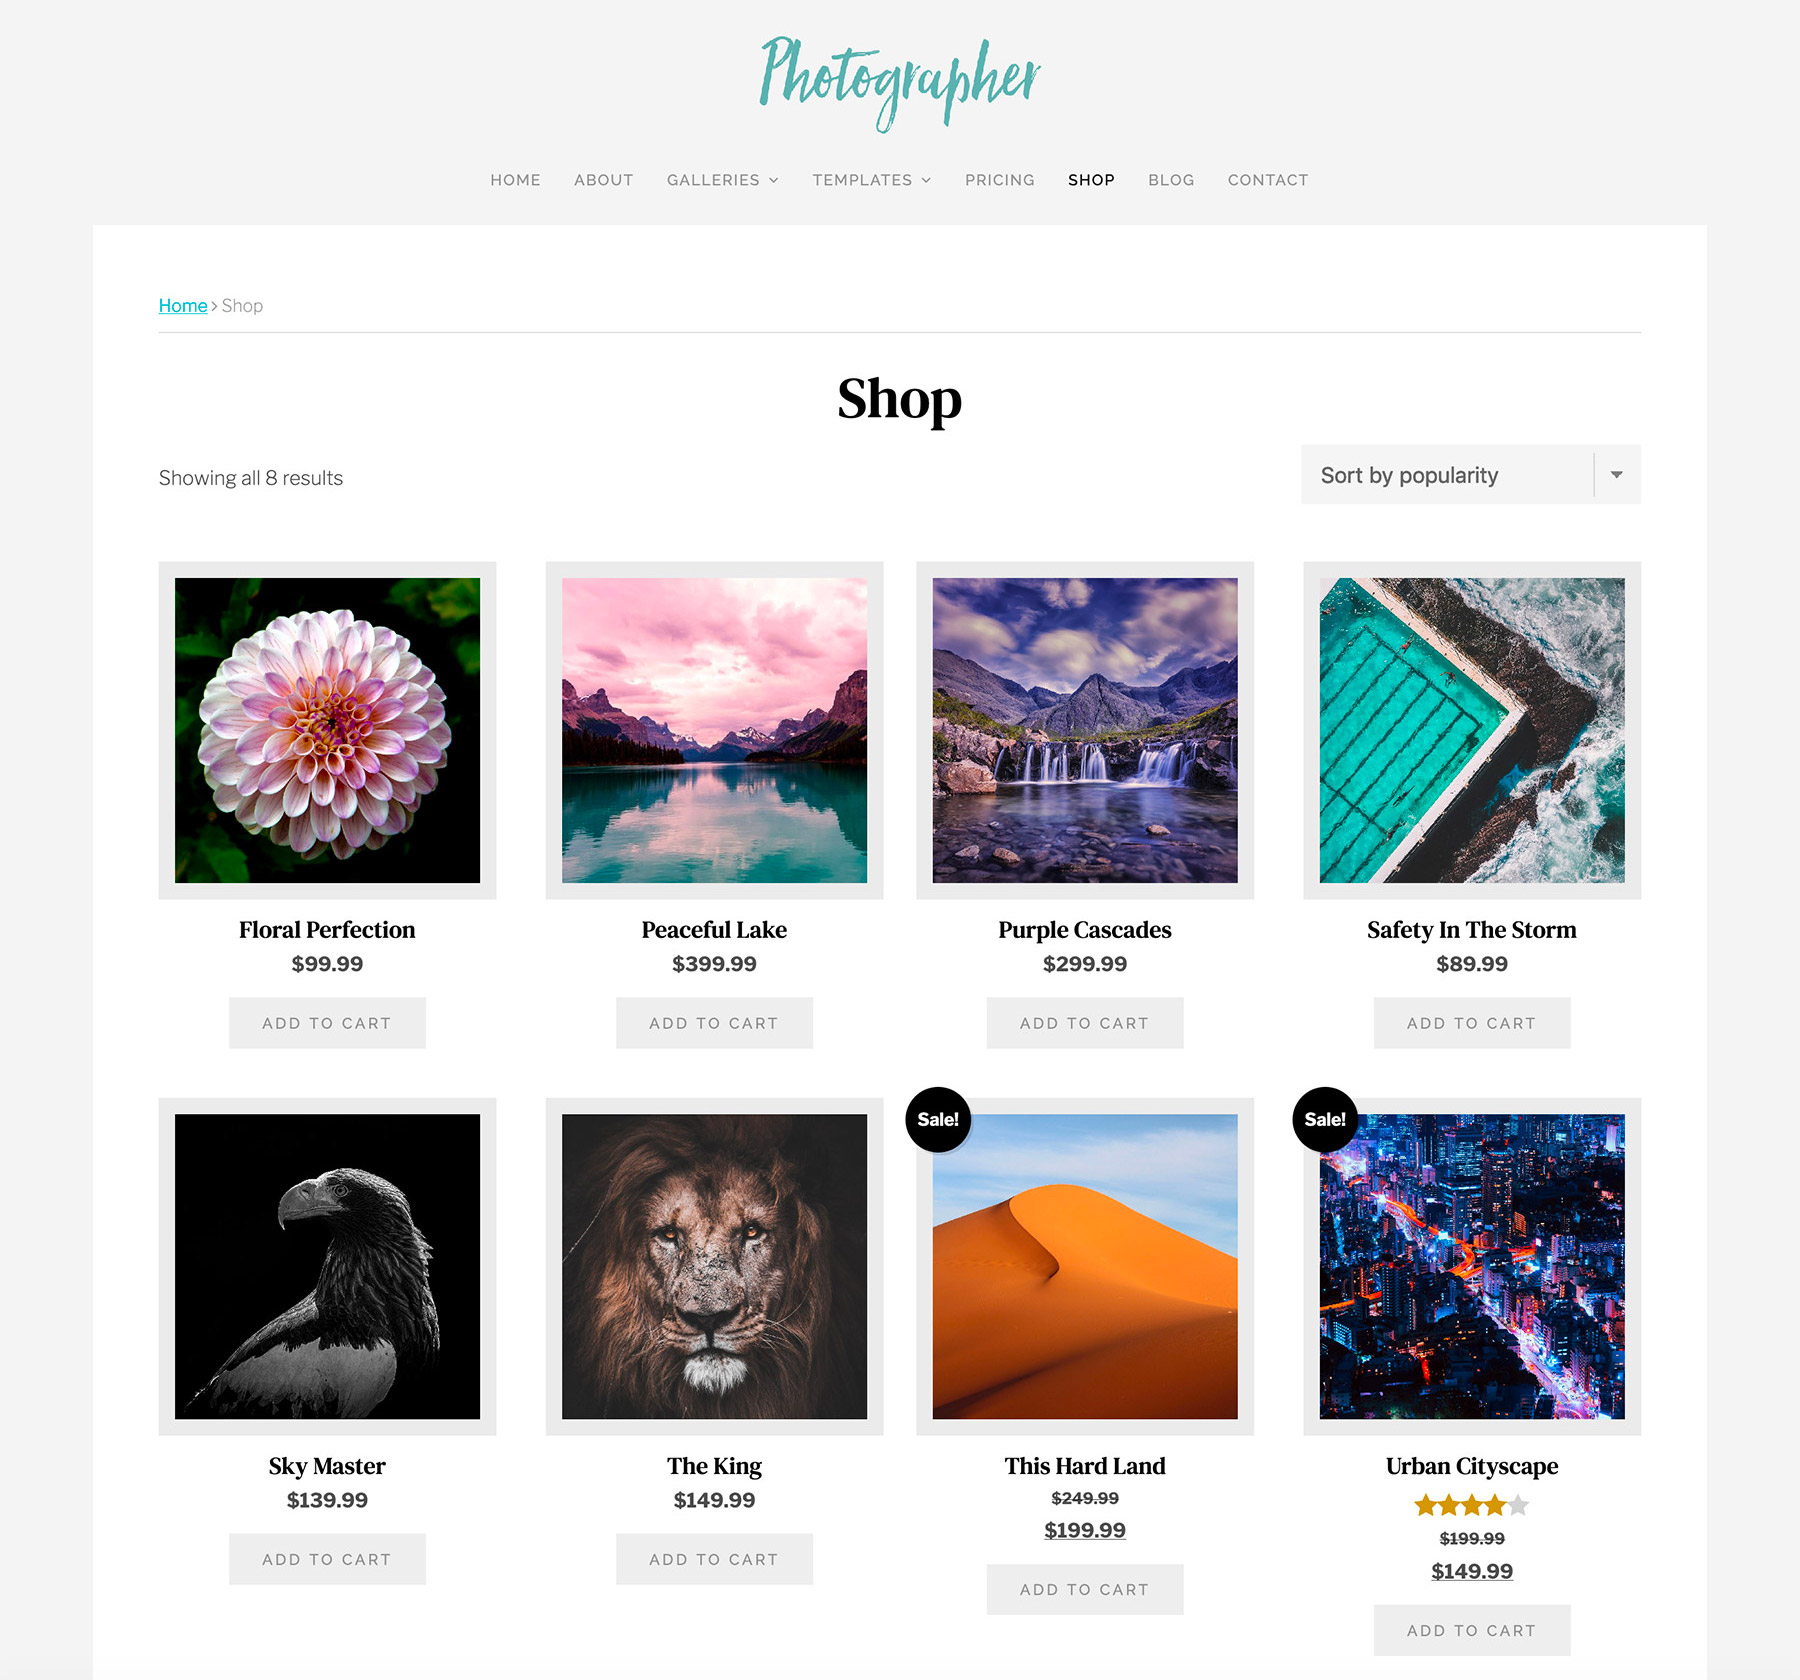
The theme integrates seamlessly with the WooCommerce eCommerce plugin. As a result, you can easily create a shop to sell your photos, or charge for photography services directly on your website.
There is no limit to the number of slideshows and portfolios that can be created using the Photographer Theme. Plus, the design is highly customizable. Meaning, you can change colors, fonts, layouts, add your personal logo, and much more. So, your website won’t look like a template. It will match your brand and your style.
You can learn more about the theme here, and view the demo.
5. Theme Installation And Setup
Now that you’ve purchased and downloaded the theme, it’s time to install it! Fortunately, the Photographer Theme features a simple setup process. In this section, we’re going to install and activate your theme. Then, we’ll install the demo content to use as a guide.
Installing And Activating Your Theme
Assuming you have already downloaded your theme, and you’re logged in to the WordPress dashboard of your staging site, follow these instructions:
- Navigate to Appearance > Themes in the WordPress admin.
- Click the “Add New” button at the top of the page.
- Next, Click the “Upload Theme” button at the top of the page.
- Then, Click the “Browse” button, and locate the .zip file of your downloaded theme.
- Install the theme.
- Activate the theme.
Okay, the Photographer Theme is now activated on your staging website. Upon activation, a notification should appear in your dashboard, prompting you to install some plugins and activate your theme license. These plugins are necessary. So, follow the prompts to install and activate the plugins and your theme license.
Installing Demo Content
A WordPress theme does not come installed with content out-of-the-box. It’s a blank canvas, awaiting your content. As a result, I recommend installing the demo content to use as a guide. It will help you become familiar with how content should be added and organized on your photography website. So, let’s install the demo content:
- Install and Activate all required plugins.
- Navigate to Appearance > Import Demo Data in the WordPress admin.
- Click the blue “Import Demo Data” button.
- Wait for the import to complete.
Now, your site should appear almost exactly as the Photographer Theme demo.
Personalizing Your Theme
![]() Before you begin replacing the demo content, let’s make a few changes to personalize your site. So, let’s add your logo:
Before you begin replacing the demo content, let’s make a few changes to personalize your site. So, let’s add your logo:
- Navigate to Appearance > Customize in the WordPress dashboard.
- Within the Customizer, navigate to Site Identity.
- Click the “Change Logo” button.
- Upload your logo image.
- Scale your logo using the Logo Resizer.
- Optionally, you may change the logo alignment, or choose to display the site title in its place.
- Publish your changes.
Once your logo has been added, you’ve made the first step to making your website feel like your own. Within the Customizer, there are several other options available for changing colors, fonts, and settings. For a full list of options, you may refer to the theme documentation.
6. Replace The Demo Content
Now you have a photography website on a staging domain with your logo displayed at the top — great! However, the content is not your own. So, let’s replace it!
All demo content for the Photographer Theme exists in the form of post types, such as posts, pages, portfolio projects, and testimonials. Next, we’ll edit the content within these post types.
Using WordPress Posts
First, let’s take a look at how posts are used throughout the theme. Once you understand their usage, replacing and adding content will be easy.
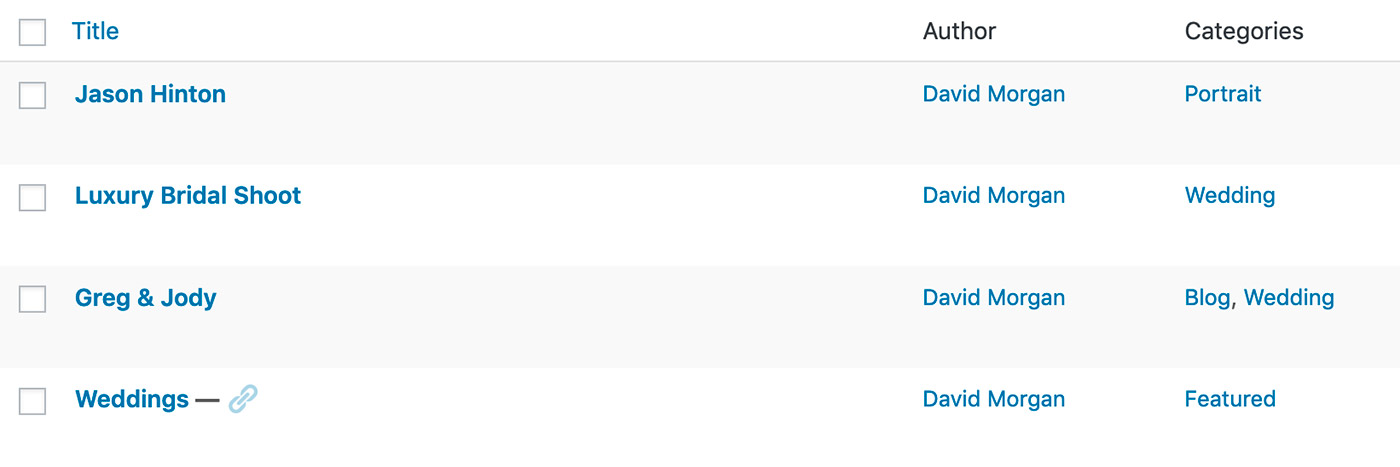
Posts are used to display blog articles, slides within the home page slideshow, and portfolios on your website. Categories determine the location where a post appears.
Categories are a way of organizing content within WordPress. In the case of the Photographer Theme, understanding how to manage categories is essential. Furthermore, you can create as many categories as you need. As you can see in the following screenshot, each post has a category applied.
Creating Category Portfolios
A category page displays all posts with a specified category applied in a portfolio style layout. For example, you can see the “Portrait” category page in the demo here.

Each post on the page will display its associated Featured Image. When each image is hovered, the assigned category, post title, and an optional excerpt will display. Additionally, clicking the image will take you to the associated post content. As you can see, creating a category portfolio page is perfect for showcasing photography projects and events.
 Create new and edit existing categories within the Post > Categories section of the WordPress admin. Alternatively, you add new categories while creating a post. Continue by editing each post and category, replacing its content with your own.
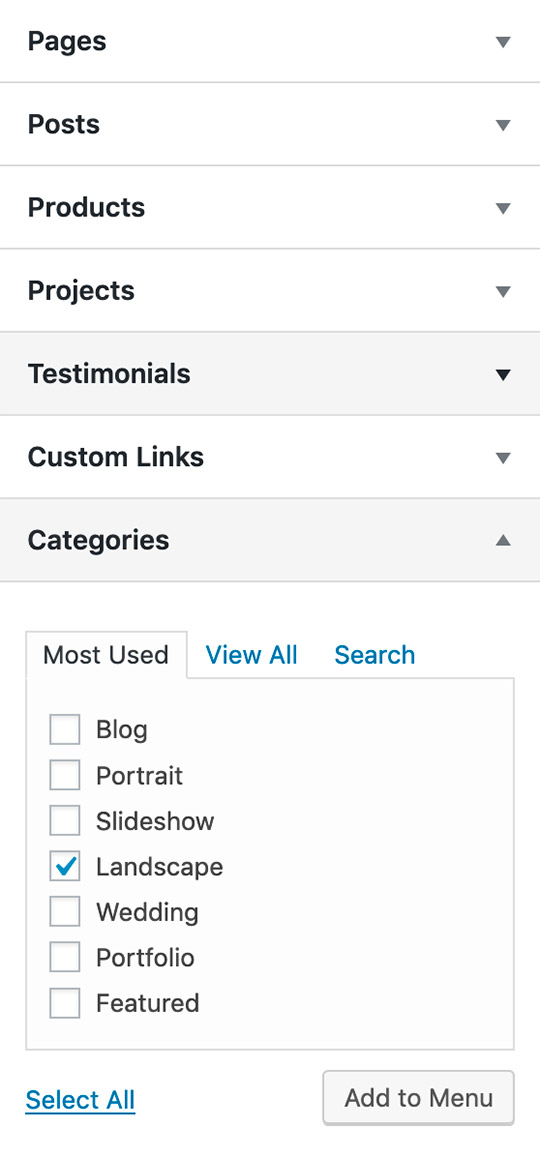
In order to add category portfolio links to your website navigation menu, follow these simple steps:
- Navigate to Appearance > Menus within the WordPress admin.
- Select the “Main Menu” to edit.
- Maximize the “Categories” list of menu items.
- Click the boxes next to the categories you want added to your menu.
- Click the “Add to Menu” button.
- Drag the added categories into your desired position.
- Click the blue “Save Menu” button.
Now, categories are displayed within your main website navigation. As a result, clicking the menu link presents the visitor with a portfolio of all posts featuring the associated category.
Creating Image Slideshows
In this section, I’ll explain how to create an image slideshow page, as seen in the demo here.
Before creating the slideshow, you must first upload the images intended for display. So, follow the steps below to add your slideshow images:
- Navigate to Media > Add New within the WordPress admin.
- Drag and drop your slideshow images into the upload field.
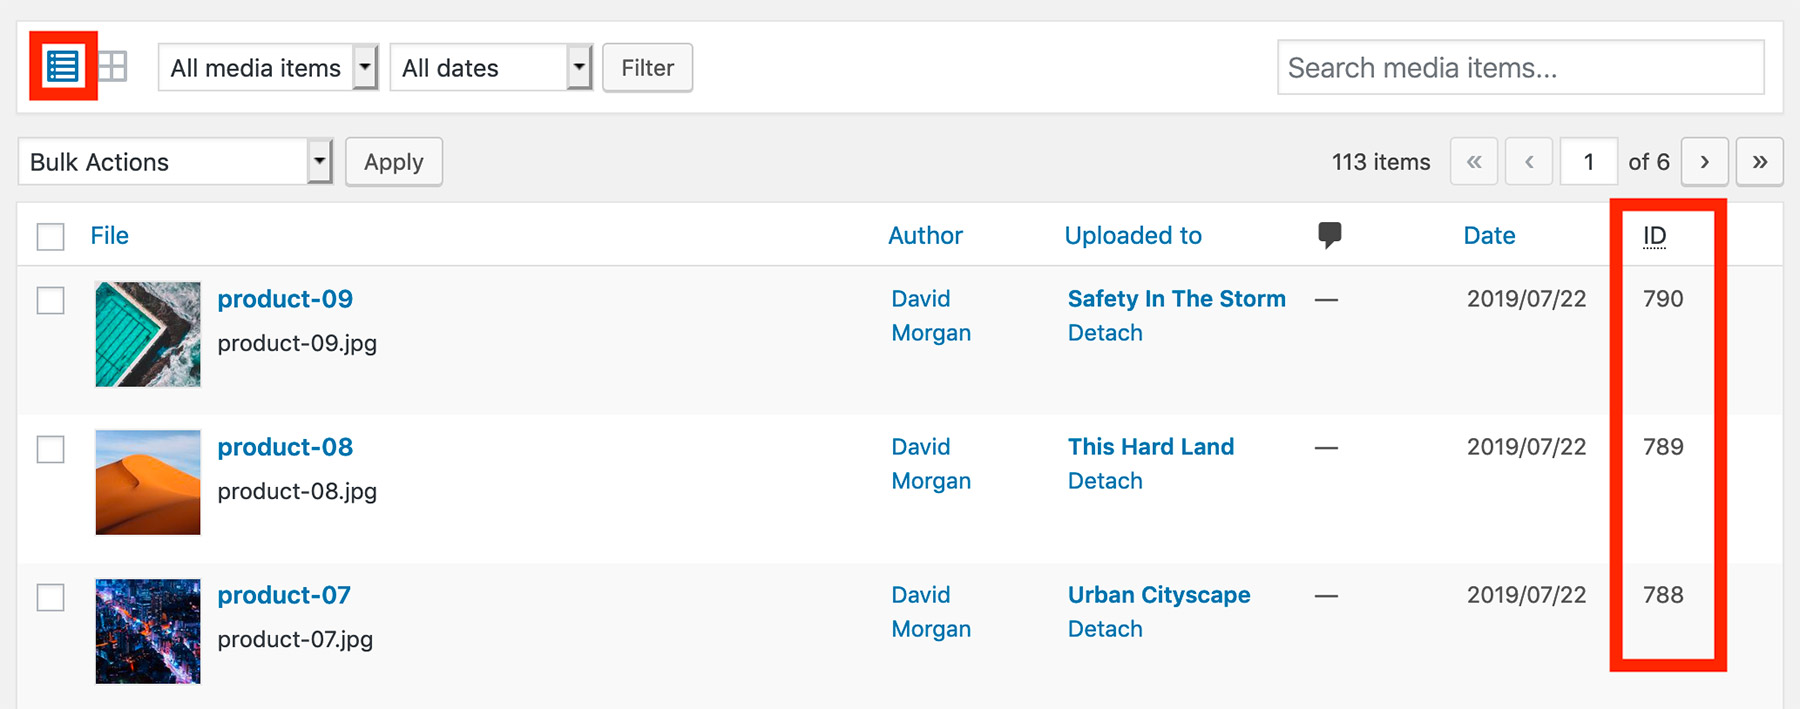
- Once your images are loaded, navigate to Media > Library in the admin.
- As seen in the screenshot, click the list layout icon. Your media will then display in a list.
- Now, make note of the image IDs you want displayed in your slideshow, as seen above. If you don’t see the IDs listed, make sure the recommended Reveal IDs plugin is installed and activated.
Keep those image IDs in mind. Next, we’ll create a slideshow page.
The Photographer Theme includes page templates. A template may be applied to any page. As a result, that page will inherit the intended functionality and layout of the template. For creating slideshow pages, we’ll start by adding a new page and applying the “Slideshow” template:
- Navigate to Pages > Add New in the WordPress admin.
- Add a title to your page.
- Within the page editor, add a “Shortcode” block, as seen in the screenshot.
- Enter the WordPress “Gallery” shortcode with your image IDs into the block. For example, [gallery ids="790,789,788"].
- Use commas to separate each image ID.
- Publish the page.

Please Note: If you’re using the WordPress Classic Editor, you only need to add the default WordPress gallery to the page instead of the shortcode block.
Finalizing Your Content
Continue replacing the demo content as needed. Delete any leftover posts, pages, and categories added by the demo content. Once your content is ready, proceed to the final step.
For additional help, please refer to the Photographer Theme documentation.
7. Point Your Domain
It’s time to go live! This is the final step. Fortunately, it’s an easy one!
Remember back in step 2 when you registered a domain? Well, now it’s time to use it.
First, we need to add the domain to your hosting account. Assuming you signed up for Organic Hosting, you can login to your account here. Once, logged in, add your domain within the “Addiitonal Domains” section, as in the screenshot below. That was easy.
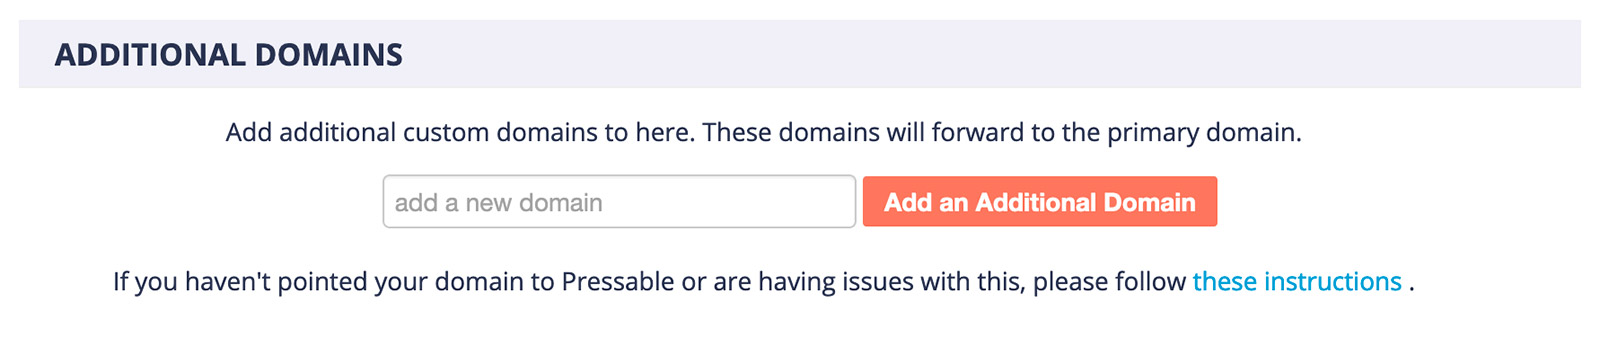
 Next, we must “point” the domain at your host. To do so, you’ll first need to locate the nameservers of your hosting provider. While still logged in to your hosting account and viewing the “Additional Domains” section, click the “instructions” link to reveal your nameservers. Got em? Now, let’s get to pointing:
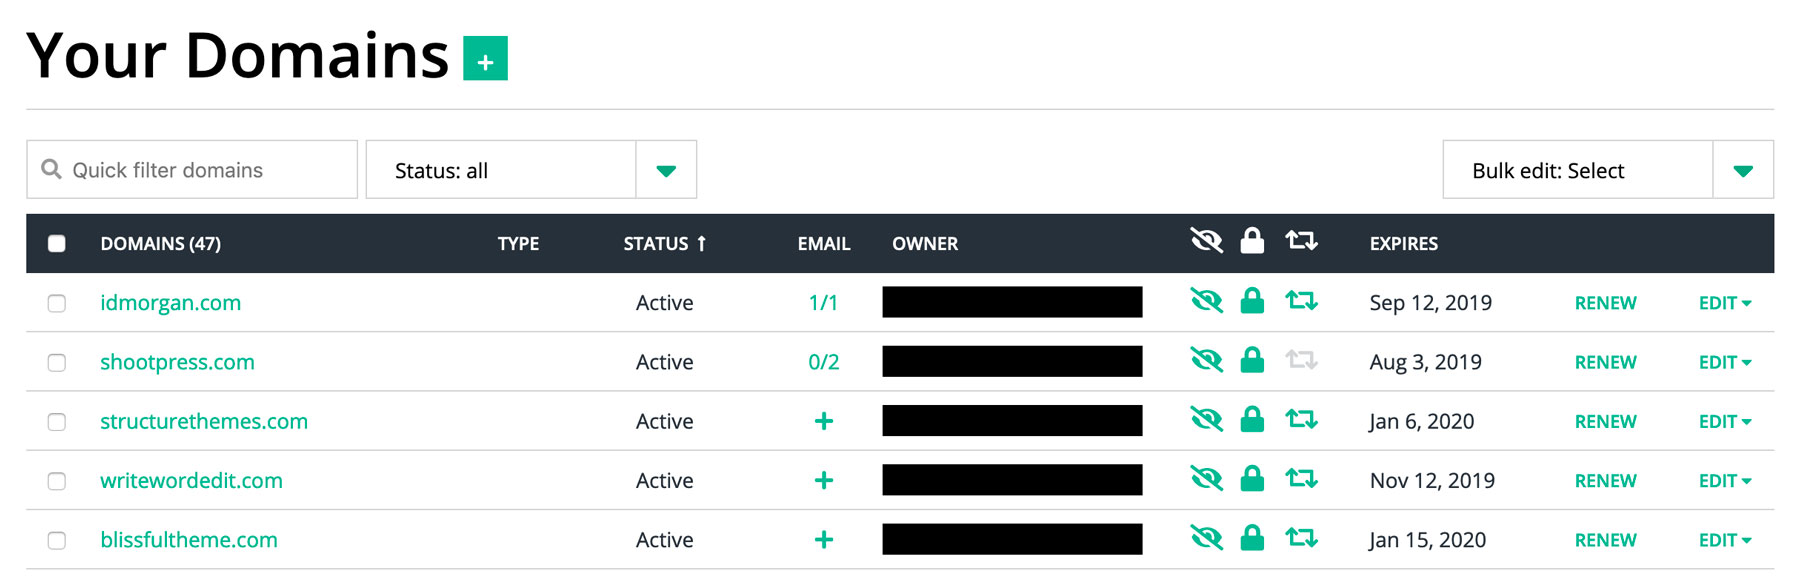
- Within a new browser tab, login to your domain registrar.
- Assuming you chose Hover, your domains should be listed here.
- Click the Edit > Edit Nameservers link beside your domain.
- Enter your host’s nameservers within the fields. Add fields as necessary.
- Click the “Save Nameservers” button.
That’s it! You’re site will be live soon.
It may take up to 30 minutes before your domain has propagated. So, take the time to treat yourself. Go get a coffee. Pat yourself on the back. Soon, you’ll be passing out business cards with your professional WordPress photography website listed on them.